Reduce draughts. Improve comfort. Lower energy bills.
Airtightness helps your home hold onto heat, control moisture, and support healthy ventilation. This guide explains what it means, why it matters, and how to improve it as part of a home retrofit.
What is airtightness?
Airtightness describes how much uncontrolled air leaks in and out of your home through gaps in floors, walls, roofs, and around openings.
Good airtightness means:
-
Air only enters and leaves through planned ventilation
-
Not through hidden cracks and gaps
Watch Adam from Intelligent Membranes explain all about airtightness from our home retrofit project in Cambridge.
How to improve airtightness
Quick Wins (Low-cost or DIY)
-
Draught-proof doors, windows and letterboxes
-
Seal gaps in skirting boards and floorboards
-
Fit seals to loft hatches
-
Use pipe and cable grommets
-
Close or cap unused chimneys correctly
During Retrofit Works
For bigger projects, take a more joined-up approach:
-
Create a continuous airtight layer around the home
-
Use membranes, tapes or liquid coatings to seal gaps
-
Include a service zone so cables and pipes don’t damage the airtight layer
-
Plan works so the airtight layer is installed early and protected
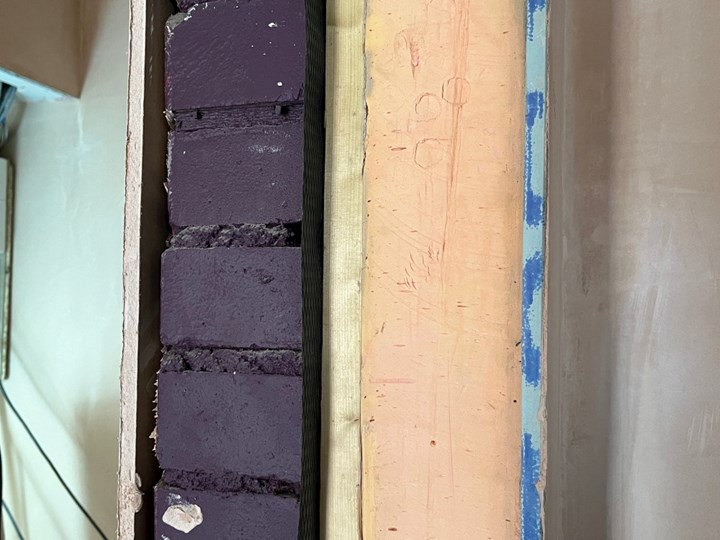
Key point: Airtightness is not one product - it’s a strategy built on good design and workmanship. Pictured left you can see the purple painted brick wall with the liquid membrane, alongside the insulation and new plasterboard.
Ventilation and indoor air quality
As your home becomes more airtight, planned ventilation becomes essential.
Good practice:
-
Always pair airtightness improvements with ventilation upgrades
-
Ensure strong extraction in kitchens and bathrooms
-
Consider humidity-controlled fans or MVHR (Mechanical Ventilation with Heat Recovery) for deeper retrofits
Key areas to get right
Focus effort on:
-
Wall–floor junctions
-
Wall–roof junctions
-
Window edges (heads, jambs and cills)
-
Transitions between different materials
These are where most hidden leaks occur.
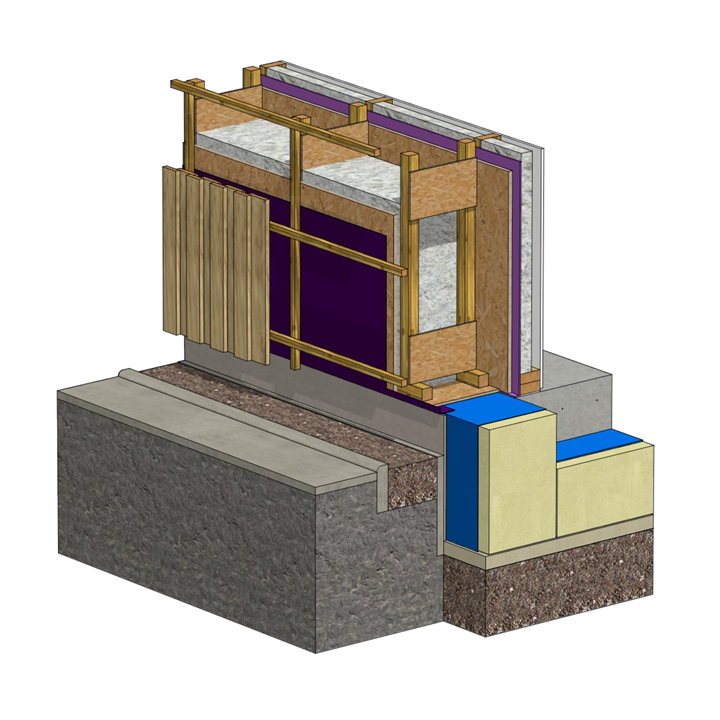
Image on right shows cross-section example of wall to floor junctions. Image credit: Intelligent Membranes.
Key areas to get right
Focus effort on:
-
Wall–floor junctions
-
Wall–roof junctions
-
Window edges (heads, jambs and cills)
-
Transitions between different materials
These are where most hidden leaks occur.
Image on right shows cross-section example of wall to floor junctions. Image credit: Intelligent Membranes.
Common myths about airtightness
“Homes need to breathe through gaps.”
No, homes need controlled ventilation, not uncontrolled leaks.
“Airtight homes feel stuffy.”
Stuffy air is caused by poor ventilation, not airtightness.
Airtightness in older homes
Existing homes can be more challenging due to:
-
Uneven surfaces and hidden voids
-
Historic alterations
Helpful approaches:
-
Use flexible products that handle movement
-
Plan service routes early
-
Seal penetrations immediately as they’re made
You don’t need perfection - every improvement makes a difference.
How airtightness is tested
A blower‑door test measures how much air leaks when the house is pressurised or depressurised.
Testing can happen mid‑works to find issues early and again at completion.
FAQs
This guide was created by Intelligent Membranes. Source content adapted from the 'Airtightness Guide – A Practical Guide for Designers, Contractors & Installers' by Intelligent Membranes.
Send me details
of the Airtightness: a homeowner’s guide to a warmer, more efficient home
If you do not receive the email with the information attached in a few minutes, please check your "junk mail" or "spam" folder.
We promise not to give your email to anyone else or use it for any other purpose than delivering the requested information.